Monday, May 14, 2012

Class 2: Week 5, 6, & 7 "Dancin' Fever"

Ok, so our second assignment for class two is now complete.

Here you can see the evolution of my Dancing Fever shot.

Week 7: Final

Week 6 Blocking Plus

Week 5: Blocking

What I learned this Assignment.

Have faith in your shot, and keep moving forward.
- In the last week of the shot I was feeling done with my shot, and not because I'd done as much as I could do, but rather because I was overwhelmed by all the things I had to do. Thinking of my shot was painful. I felt that nothing I did would make a big difference and that the mistakes I'd made were deeply rooted in the basic steps. I resolved to simply do the minimum. Address the notes from last weeks ecritique and turn it in popping and jittering. Take as low a grade as I've ever gotten, and get started on my next shot. However the  guilt and shame I felt abandoning my shot like that hurt more then the weight of fixing it would be. So I dig down deep and did what I could. It's not perfect but I made it and I didn't give up. That's something to be proud of. 

Exaggerate, what you see.
- My notes for the first and second weeks had a lot of the same critiques:
---Exaggerate, the up and downs (Y translation)
---Exaggerate the curves of the torso
---Go higher
---Go farther to the side.
-I'll continue working on creating strong and appealing exaggeration. 

Smooth arcs make a Big difference.
- One of the things I got in my ecritique was to address a specific arc. Once that was addressed I continued to do a whole "Arc Pass" of the shot. That and addressing all the foot planting, and graph overshoot. Those simple steps took my shot to a whole new level and were so worth it in the end.

If you want to make an "S" curved pose keep the torso in a "C" curve, using the head and legs to make the "S" rather then snaking the body.
-Honestly I'm glad I got this note from my mentor, the movement looks much more natural and organic. Also I want to remember that snaking the body though not always appropriate had great appeal to me while I had it in the shot, and I will keep that in my tool belt as well as Scott's tool of Torso C.

Planning starts with an idea.
-Getting started on my next shot, a Heavy box pull, I did the most logical thing for a student to do. I turned on a camera and started filming myslef pushing some chairs without a clue as to what I actually wanted to do. Of course once I got that on the computer and started to analyse it, it was clear that the reference I had shot was bland and sloppy. Recognizing this, I decided to make a three word story arc, 
"Assess"
"Attack"
"Re-assess"
this would illustrate how I wanted to film my reference, and gave me a basic framework for how to approach the shot and build an entertaining story. 
That video reference was much better and funner to film. However once I got that to the computer, I found all my passes were to long in terms of frame rate. (I was mistaken thinking the shot was 100-200 frames when it's 100-250) So, I went to youtube and found a great video to reference instead. 
- Still planning out a shot on paper before getting up and "doing" it will be a huge part of my process I'm sure.

Here's My planning for Next Weeks Shot: "Heavy Pull"


And here's the reference video I found on youtube.
and here's the sight were I got the tools to download youtube videos, and convert them into quicktime.Youtube Downloader

In the spirit of not giving up I was up till 3am Saturday night/ Sunday morning just to get this work done.
(Of course if I'd planned ahead that wouldn't have been necessary) ; )

Completing this dance shot has given me a renewed sense of pride and achievement and a renewed sense of humility. I plan to keep the box pull simple and of a high quality. 

Thanks for stopping by, and I'll talk to you soon. : )
--Max

Sunday, April 22, 2012

Class 2 - Weeks 3 + 4

So far so good.

My Mentors advice to keep our shots simple is really helping me to dig into the material and grow.

I'm very happy with the improvements in my work, and am inspired to continue this development.

The positive feedback I've been getting is so encouraging, and has nothing to do with the complexity of my shot but all to do with the quality, which is even more rewarding.

So a recap of the last 2 weeks:
Week 3: Side Step - Blocking Plus

Week 4: Side Step - Polish and Clean to Final
and
Start planning for next shot!

Here's my submitted work for Week 3.
The moment when this became something I was proud of was after I took the time to refine the timing using logic to space the keys.
Before I had been going off of my video reference timing with a few minor changes to up the appeal.
When I re-timed the whole thing, however, the shot gained a new life.

Mentor Notes:
- Pushing Poses
example from ecritique:

Here's my submitted final animation for Week 4, using my Mentor and Peer feedback.

Some weirdness still in the knees at least but overall I'm really happy with the progress that happened through out this assignment.

Preview for Next week- Week 4 Planning

Reference Video:
PS - This Choreography came from an audition I went to earlier that day for a production of Baby the Musical.


and Sketches:

     Page 1 Page 2Page 3

I wonder if this shot will be more complex then I realize. Choosing a dance is based on my past on stage as well as our lecture for the week used a dance shot to demonstrate new animation workflow, and I want to use these new techniques. Having a similar shot may help use the similar workflow and broaden my tool belt to handle different kinds of shots in different ways.

Thanks for checking in,
Talk to you soon.
--Max

PS
Also going on this week, I opened a new show. "The Pajama Game" a musical presented by the Local Jewish Federation. I'm double cast as the lead and switch to ensemble in alternate shows.

Here are a couple Pics of me as the lead, Sid Sorokin, the new superintendent of the Sleep Tite Pajama Factory. Half of a budding romance caught in the rising tension of a union war between management and workers over a 7 1/2 cent pay raise.


First Day on the job, repairing a broken machine

"Hey There"- my don't fall in love song.

The Sleep Tite Company Picnic

An intimate moment between Sid and Babe, the romantic couple

"I love you mooooooore!"

Thanks for checking these out,
Happy Animating. : D
--Max

Sunday, April 8, 2012

Class 2 so far - Weeks 1 + 2

More depth into each assignment,
Applying the principals learned in Class 1,
More emphasis on workflow and planning in the lectures.

4 week shot
Pick list 1: I chose the side step to keep it simple, mastery before challenge,

Week 1:
Video reference:

Picking keys, and break downs:


Week 2:
Sketching out the poses:

And finally...

Blocking:


Mentors Main Impression: "You're heading in the right direction. Keep moving forward." 

Next week Blocking Plus.

Thanks for viewing,
--Max

Saturday, March 24, 2012

Class 1 - Demo Reel


Here's my Class 1 Demo Reel.

Being where I am on my animation journey, I can see all the things I did and think "Wow, I've improved so much," and at the same time say "Wow, have I got a long way to go."

Here's to a long and beautiful road ahead.

Enjoy,
Max

P.S. See you in Class 2!

Sunday, March 18, 2012

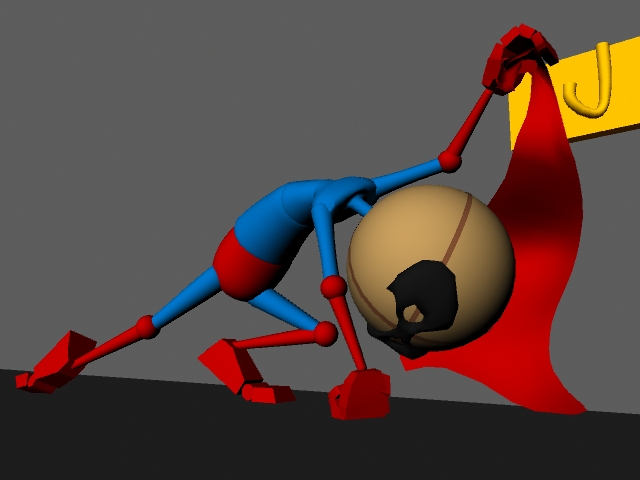
Class1 Week 10- EXHAUSTION Pose

Exhaustion Sketches:
Things not drawn:
2: Chair and foot rest.
8. Umpire/ referee outfit on the standing dude.
9. Subway arm handle
10. Head and hand resting on a chalk board in an elementary school

 Sketch Chosen to Stu-ify and used as an image plane in Maya to reference.
(The symbol on the cape stands for his Super Hero name "Super Star")

Submitted Pose:
Used this tutorial to make the hook- http://www.youtube.com/watch?v=eucvqSzRpTA 

Screen Cap of my Q+A Comments

Fun Tips learned:
Making a Cape: Rectangle> increasing the divisions of geometry> using soft select to warp the material into the desired shape.
Coloring Stu's Body: Did it the heard way here's the easy way...
Provided by Mariel Sanchez on Facebook AM Feedback Group:
Mariel Sanchez Incase anyone needs it too, Ace gave me these instructions so that we can select the mesh:

"the big circle control, its called stewie_etc in the outliner

do this open stewie_etc - stewie_ac_rig - stewie_ac_anim - stewie_ac_C_visibility

once u have the last one selected go to your channel box scroll down to Geo Display, it will say its referenced, click on the refence adn a drop down will appear
click on normal
now you can select the mesh!
dont forget to put it back to referenced though"

Thanks for reading,
--Max

Class1 Week 9- CONCERN Pose

Week 9 - Concern Pose

Here in Blue is my submitted assignment:
 Here are some alternates:
 
 
(Blue was actually the last one I did, Green was the first and Torch was in between. Sometimes the sketches that look best don't translate as well to 3D or to a premade model.)

The render process for the poses above used Maya lighting with backgrounds and silhouettes entirely made in Photoshop. Very fun to do. : )

Here are the sketches I submitted, Hand drawn then enhanced in Photoshop:

Number 1 is pleading with a friend.
Number 2 is on a bench (not drawn) scooting away from a creepy stranger
Number 3 is reaching out to a friend in need.
4 is turning in a doorway (not drawn) after hearing some shocking news.
5. Stagefright.
6. Beaten to the floor
7. Bashful
8. Home Secruity
9. Exploring deep dark caves.
10. Shy
11. Concerned his experiment will EXPLODE!

Number 6 reminds me of the white cat Victoria from the Musical "Cats" which is the reason for the coloring, also it evokes innocents and vulnerably like a child. If I was to make a fourth it would be that one.

Also after drawing numbers 2 and 3 I realized it looked like they were connecting. : D

Thanks for stopping by,
--Max

Tuesday, March 6, 2012

Class1 Week 9- First Finished Walk!


Well you've seen the planning, you've seen the blocking, now for your enjoyment I present the 
Animated Vanilla Walk!


Thank you for watching,
Max